THOUSANDS OF FREE BLOGGER TEMPLATES

Notice

My Daughter was born on Feb 14, 2010 and she is wonderfully healthy! Thank you for all the wonderful emails about everything. I just wanted to say that for right now since life has gotten so busy I am working mainly on tags and layouts. There will be the occasional tutorial but not as many as before. I am sorry if this causes any problems, but family comes first! I hope this finds all my followers doing well! Blessed Be! ~Lori

Quick Links

These are the Quick Links to my most used supplies =]

PSP
Alien Skin
Vix
Squirlz Water Reflections
Garvey
Gorjuss
Animation Shop

Sunday, August 30, 2009

Tiffany

  • For this tutorial I have used the wonderful Tiffany Kit by Vicki at Gemini Creationz which can be bought HERE
  • Alien Skin Eye Candy 5 Impact Trial can be found HERE

  • First you are going to open your base, I have used the fancy tag, any of the tags or brads will work for this though, just remember to re-size if you need to.
  • Layers>New Raster Layer, Normal
  • Zoom in to about 250% and with your lasso selection tool you are going to use point to point with a feather of 2 and select the inside of your tag.
  • Effects>Plugins>Alien Skin>glass with the following settings. (remember when I give you settings it is what I used feel free to change anything you may want.)
  • Add your text for your tag and move it under the glass by selecting the layer in the layers palette and just moving it down.
  • Add all embellishments to the tag you would like.
  • Save

Tuesday, August 25, 2009

Hanging Around


For this tutorial I used the Spooky Hallow Kit from Vicki at Gemini Creatioz found HERE
Animation Shop trial found HERE
Alien Skin Eye Candy 5 Textures trial found HERE
FONT is Riesling

I like to start big because it makes it easier for me so I opened a new canvas 800x800 white
Apply the web and stretch it to fit the whole canvas by pulling the corners. Drop Shadow 4,4,100,14,black (this is the drop I use for the whole tag)
Apply the rope frame to the center. Drop Shadow.
Useing your free hand selection tool set on point to point with no feather Draw a line around the inside of the rope frame. Selections>Invert and then hit your delete key on your keyboard. This should take away any extra web from around the frame.
Add the broom and the bat to the tag. drop shadows on both. minimize your tag for a moment to work on the nest step.
Open Branch, Fall flower 2, fall flower 4, fern leaf, gflower,
Open a 600x600 transparent layer for your base
Apply in this order... Fern, Branch, and then the flowers. For my effect I made the branch with a slight sepia tone to bring out the gray in the flowers. Drop shadow each item. Merge Visable.
Copy
Open back up your tag and paste your flower arrangement on the tag near the bottom.
Layers>New raster layer>normal
Using your preset shapes took you need to be on rounded rectangle. For my inside I picked up a nice orange from the sunflower, and flood filled the rectangle.
Effects>Plugins>AlienSkinTextures>Marble
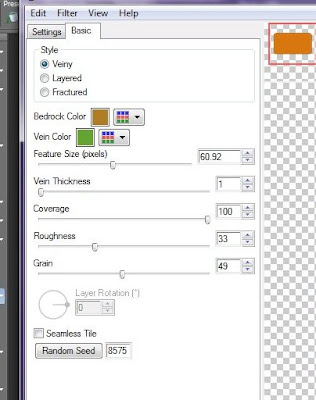
Effects>3D>Inner Bevel> Rounded Width:8, Smoothness0, depth20, ambiance0, shiny0, angle 315, intensity 50 and elevation 30
Apply all text and copyrights.
RESIZE tag, I used 70%
Add Spider and make her sit nicely on your frame. If you would like your tag NON animated go ahead and save it now.
For an animated version this is where you open your Animation Shop
Copy tag Merged.
Paste as new Animation
Back to PSP
Move your spider slightly
Copy Merged
Paste after current frame in Animation Shop.
You are going to continue the back and forth until you have your spider walking all the way around the frame. For when the spider is behind my sign I have 2 frames without the spider in them at all.
Run
Save.

Sunday, August 23, 2009

Fly-by

  • For this tutorial I used the Spooky Hallow Kit from Vicki at Gemini Creationz found HERE
  • Animation Shop (trial found HERE)
  • Alien Skin Eye Candy 5 (Trial HERE)
  • Open a 700x700 new canvas flood filled white.
  • Add GCZ_SH_Frame
  • Center GCZ_SH_Moon over the frame PLUGINS>Alien Skin Eye Candy 5>Gradient Glow. I took the Green Glow setting, changed the color to WHITE and the glow radius to 21.80, 35, 100, 100, 65, 100 Random Seed.
  • merge down.
  • PLUGINS>Alien Skin Eye Candy 5>Gradient Glow. I took the Green Glow setting, changed the color to a DARK BLUE and the glow radius to 21.80, 35, 100, 100, 65, 100 Random Seed.
  • Add GCZ_SH_Broomwitch and GCZ_SH_Cat. Place these where ever you would like on your moon layer.
  • Add text and copyrights (My text also had the white glow as used above)
  • MERGE ALL
  • Add GCZ_SH_Spider some place under the broomstick.
  • VIEW>GRIDS
  • VIEW SNAP TO GRIDS
  • Using your Pen tool with the following settings:(you will have to click to see the full toolbar)
  • Black and Black. You are going to draw a line from the spider to the broomstick. The grids will help you to insure the lines will remain straight and the Snap to grids will make sure the spider staying in the correct area as well.
  • COPY MERGED
  • PASTE as a NEW ANIMATION in Animation Shop
  • Back in PSP Move your spider down... I counted 4 grid clicks.
  • Back to your pen tool and connect the end of the old line to your spider.
  • COPY MERGED
  • PASTE AFTER CURRENT FRAME in Animation Shop.
  • Do this as many times as needed for the spider to move as you would like.
  • RUN
  • SAVE as a .gif

Saturday, August 22, 2009

Freebie Frame

I was playing so I made this frame from the Ghosts of Halloween Past kit from Gemini Creatioz which can be found HERE


Link to Frame is HERE

Fly Away


For this Tutorial I have used the work of Julie at Bits N Bobs the kit is Summer Spritz and can be found HERE
The work of Suzanne Woolcott which can be purchased HERE
WSL Mask84

let's begin
Open your paper of choice and apply the mask. Drop shadow of 4,4,100,20,black

Merge Visable
Apply Frame of choice with elements of choice inside the frames
Apply bubbles to one side, duplicate and then mirror
Add Tubes of choice, Copyrights, and text
Save Tag
Hope you enjoyed this easy tutorial :)

Friday, August 21, 2009

AWAKEN


For this tutorial I used the wonderful work of Vicki in the Ghosts of Halloweens Past Kit found HERE
Animation Shop

  • NEW IMAGE700x700 Transparent
  • Flood fill Gradient "Sky2"
  • ADD Drapes of choice, Duplicate, IMAGE>MIRROR (to recolor mine I ADJUST>HUE &SATERATION>COLORIZE Factory Defaults, 0, 128)
  • LAYERS>MERGE DOWN
  • ADD Bushe2, DUPLICATE>IMAGE>MIRROR
  • LAYERS>MERGE DOWN
  • I moved my bushe2 layer almost half way down my image.
  • Place Bushe2 layer UNDER Drapes Layer.
  • Add Tree, Moon, Noose, Coffin, Vampiress, Candles, whatever else you might like along with water marks/copyrights.
  • Add Text... I have mine at a 50% transparancy for effect.
  • COPY MERGED
  • Open Animation Shop
  • PASTE as a new animation
  • Back to PSP
  • Add Ghost at your starting location, mine is to the right.
  • COPY MERGED
  • Animation Shop>Paste after current frame
  • PSP
  • Move ghost a tad to the left
  • COPY MERGED
  • Animation Shop>Paste after current frame
  • **
  • PSP
  • Add Hand coming out from coffin, and move ghost again
  • COPY MERGED
  • Animation Shop>Paste after current frame
  • ** Between the stars as many times as you need to get your ghost to float the way you would like for it to =]
  • PSP
  • NEW RASTER
  • PICTURE TUBE>FLARE 50 (should be small enough to place over your candle flames and create a soft glow, if not resize and play till it seems right to you) You only need 1
  • COPY
  • Animation Shop>Paste as new animation
  • CTRL+C
  • In your first tag layer, CTRL+E to paste, click again where you would like the flare. You can do his as many times as you would like per frame. REMEMBER: The blue and red outlined frame is the one you are working in at the time. Go thru each of your frames switching which candles have the flares in each frame.
  • RUN
  • Save as .gif

Thursday, August 20, 2009

Once you go Witch

  • For this tutorial I used
  • The AWESOME Ghosts Of Halloweens Past Kit by Vicki PTU found HERE
  • The Art of Keith Garvey Tabitha Tube PTU found HERE
  • VIX mask 281 found HERE placed in Mask folder
  • Wiccan Symbol brush from gothica found HERE Placed into brush folder
  • Alien Skin Eyecandy 5 Gradient Glow trial found HERE

  • OPEN Back ground paper of choice
  • APPLY Vix281 Mask. COPY MERGED
  • PASTE as new image, and PASTE AGAIN as new layer. You may have to move it just a bit so it lines up correctly. Drop Shadow 4,4,100,4 black.
  • Apply your brush to the center of the mask. I used Size 480, Step 32, Density 100 and Opacity 100 Blend mode of normal.
  • Apply Tube of choice.
  • Add Beware sign, I recolored mine to a green to match the paper useing EFFECTS>PHOTO EFFECTS>FILM & FILTERS, DARK GREEN 35%
  • Add Candles
  • Add Text with Gradiant Glow (Effects>Plugins>Alien Skin Eyecandy 5)
  • Add Copyrights.
  • Non-Animated Save here
  • To Animate:
  • Using your flare picture tube place a small flare on the first candle, COPY MERGED
  • In Animation Shop PASTE as New Animation
  • Back to PSP
  • UNDO Picture Tube
  • Place Flare on 2nd Candle
  • COPY MERGED
  • In Animation Shop PASTE after Current Frame
  • PSP>UNDO> #rd Candle place a flare
  • AS>PASTE after current frame
  • RUN
  • SAVE as .gif

Happy Haunting

  • For this tutorial I used the Ghosts of Halloweens Past kit from Gemini Creationz PTU found HERE
  • Alien Skin Eye Candy 5 Gradiant Glow & Aliex Skin Xenofex 2 Lightning trials found HERE Both installed into your plug-ins before hand, because if you do not they will not show up
  • Two wonderful Chubbies from Farrah's Creations that are PTU and can be bought HERE
  • Animation Shop trial found HERE
  • Font is Halloween Spider not sure where I got it, I have had it for years LOL.
  • Grab something to drink and let's get started =]
  • OPEN your choice of backgrounds. I liked the stars.
  • ** If you want more color to your background like I did, use between the double stars, if not proceed to under double stars......
  • LAYERS>NEW RASTER LAYER>Normal, 100, 0
  • In your LAYERS palette right click on your BACKGROUND, CONVERT to RASTER
  • Click on your transparent layer and flood fill with your choice of colors. I used a dark navy.
  • Slide this UNDER what was your background layer by right clicking to ARANGE>Move to bottom.
  • On your old background layer, I changed my transparancy to 30% for a lighter effect.
  • Next I made my tag image using whatever elemnts I saw fit for what I wanted. The one thing I will mention IF you want to make something similar is I placed my MOON element UNDER my old bacground layer so this was also softer.
  • Add everything you need for your tag, Except your wording and lightning.
  • Now we are going to play with our Plug-Ins.
  • In your LAYERS PALETTE click on the very bottom layer (for me this was my navy layer)
  • EFFECTS>PLUG INS>EYE CANDY XENOFEX>Lightning.. I used the following settings, you can play with this as you want.
  • *****
  • COPY MERGED
  • In Animation Shop PASTE (as new animation for first frame, after use after current frame)
  • You are going to want to repete this 3 times (for a total of 4 frames) I moved my layers around though, I have 1 on my navy and the rest are on a new Raster I placed behind my tubes. Do what you think looks best for you.
  • ******
  • NOW while you are clicked in your animation
  • CTRL+SHFT+A
  • CTRL+SHFT+C
  • CTRL+SHFT+L... 4 times, so you have a total of 20 frames. The need for all 20 will make sense here in a min just trust me =]
  • Bact to PSP we go....
  • NEW RASTER Make your text that you want to fade now, Mine is Happy Haunting.
  • EFFECTS>Plugins>Eye Candy 5> Gradiant Glow>Dark Aura
  • COPY
  • Move to Animation and PASTE as a new Animation.
  • On the BLUE BAR, RIGHT CLICK, INSERT IMAGE TRANSITION, DISOLVE:
  • CTRL+SHFT+A (select all)
  • CTRL+SHFT+C (copy)
  • Over to tag layer
  • CTRL+SHFT+A (select all)
  • CTRL+SHFT+E (paste)
  • Now this will be floating so do not click again until you have it where you would like it. If you need to change it just go to EDIT and Undo.
  • BACK to PSP
  • NEW RASTER
  • Make your name if you are doing so.
  • Copy and paste as a new animation
  • CTRL+SHFT+L 19 times for a total of 20 frames
  • CTRL+SHFT+A (select all)
  • CTRL+SHFT+C (copy)
  • Over to tag layer
  • CTRL+SHFT+A (select all)
  • CTRL+SHFT+E (paste)
  • RUN ANIMATION
  • ***If it is to fast for your liking go back to the frames layer and CTRL+SHFT+A, ANIMATION, FRAME PROPERTIES. I changed mine from 10 (default) to 25***
  • AFTER RUNNING, SAVE AS GIF FILE.
  • Hope you enjoied this one!

Wednesday, August 19, 2009

Summer Dreams


  • For this tutorial I used the Summer Spritzer kit from Bits N Bobs found HERE
  • Animation Shop
  • Here we go
  • First open a 600x600 canvas with the background color of your choice. I am a fan of purple as always but what ever you want and what works for what you have in mind.
  • Using the Vines (Element-4) I have created a base by duplicating the vines and rotating 90 degrees, each of 3 times (for a total of 4)
  • On top of that base I created a frame type layer useing the flowers. In another version I used the bling strings, so what ever works, just make a frame from them by rotating.
  • Between the two I placed a frame of the feathers for some added color.
  • I have used a mist by Christine for my tube, if this is your photography please let me know and I will give proper credit for it.
  • Next you are going to want to open your Kite. I have recolored mine just a touch useing Effects>Photo Effects > Film and Filters. I used 85 and a dark purple to get the light purple I have.
  • Place the Kite where you would like it to start.
  • COPY MERGED
  • In Animation Shop PASTE as new animation
  • ******
  • BACK to PSP
  • Move your Kite to the 2nd position
  • COPY MERGED
  • Back to Animation Shop
  • PASTE AFTER CURRENT FRAME
  • ******
  • Repete inside the ****** as many times as you would like to get the kite to follow the path you desire. Make note of how many frames you have.
  • Leave this all open and go back to PSP
  • On your tag LAYERS>NEW RASTER>Normal, 100, 0
  • On this layer you are going to place your text, watermarks, copyrights ect. Make sure it is all on this one layer by Merging Down when you are done with your text. (A good way to make sure that is all you have on this layer is to hide all text and watermarks by using the eye in the layers pallet on each layer... then merge visible so all you have is your text.)
  • While you are selected on the new text layer, COPY (DO NOT COPY MERGED!!!)
  • In Animation Shop PASTE AS NEW ANIMATION
  • CTRL+SHIFT+L to repete the frame as many times as you need it (I needed 6)
  • CTRL+SHFT+A (select all)
  • CTRL+SHFT+C (Copy)
  • Go to your OTHER (Tag) Frames
  • CTRL+SHFT+A (Select all)
  • CTRL+SHFT+E (Paste)
  • RUN your Animation
  • SAVE as .gif file.

Tuesday, August 11, 2009

God's Art


For this tutorial I used the 'An Autumn Romance' Kit from Gemini Creationz found HERE
Two beautiful tubes that are PTU from Suzanne Woolcott found HERE
VIX mask #39 & 109 Found HERE (Ohhh the goodies on this site!)
Animation Shop

  • Let's begin
  • First you are going to want to pick three papers. I have the brown, orange and green for my tag.
  • With your middle color paper apply the 109 mask COPY and PASTE as a new layer on your backgound paper, I applied mine twice for a bolder effect.
  • Now with your foreground paper you are going to apply the 39 mask, COPY & PASTE on top of your other papers.... and to make the words stand out a bit, I did a 3,3, 100, 24 black drop shadow.
  • This is where you get creative, I know you are going to chage things up a bit, I used the tree, bench and squirrle from the kit because they worked with what I wanted. I applied drop shadows to everything to make it all pop. And I added my gorjuss girls.
  • After you add your wording, and copyrights you want to MERGE ALL
  • Now for the Animation.
  • I am sure there are other ways to do this, but I stick with what I am comfy with so here we go.
  • OPEN a new image about 400x400 transparent. I did this 3x because I wanted 3 diffrent leaves.
  • Useing the included picture tubes "Autumn leaves" I played around till I found three that I liked, one on each transparent image.
  • With each one you are going to want to COPY and then PASTE them on your tag. You can resize them and rotate them as you would like.
  • *****
  • On this image you are going to COPY MERGED
  • In Animation shop you PASTE AS NEW ANIMATION
  • BACK TO PSP
  • Move your leaves around, rotate them or what ever you would like and move them down the image.
  • COPY MERGED
  • ANIMATION SHOP
  • PASTE AFTER SELECTED FRAME
  • *****
  • Do everything between the *** as many times as you would like for your effect. I used 4 frames.
  • In Animation shop while clicked on your frames hit CTRL+A Then under ANIMATION you can resize if you would like (I used 70%) and you can go to FRAME PROPERTIES and change the speed. I up'ed mine to 40
  • RUN
  • SAVE AS GIF
  • There you go! I hope you had fun tonight =] Blessed Be dear friends and be sure to leave comments!

Tuesday, August 4, 2009

Color Effects Lesson


Today we are going to have a little bit of fun with different effects that are preloaded with your PSP.
I am useing the Papyrus Kit from Gemini Creationz found HERE
A picture taken by my wonderful friend Tanya Townsend which I can not share, but I am sure you can find one of your own that will work.


Lets begin.

First open your picture of choice. Make sure it is a decent size and fits whatever saying you would like to add to it.
Under EFFECTS>PHOTO EFFECTS>TIME MACHINE I used the first one, over 1839 with a 30% intensity with the photo edges ticked. This will give you your 'frame and color effects' If you would like you can play around with this to see what else you can come up with. There are some that are very pretty!
Next for to LAYERS>NEW RASTER LAYER. Normal, 100 and zero, layer is visable. Hit OK
Click on the window for this and then COPY
PASTE as new image on your workspace. (This will give you the correct size for your new images and make the additions a bit simpler.)
Now is when you allow your imagination to have some fun. Use whatever elements you would like to have around your picture. I used the flowers and the leaves and made sure each peice was in its own layer.
Once I had it looking how I wanted it to I went to EFFECTS>PHOTP EFFECTS>SEPIA TONE. Amount to age 60% This will give it all a very close effect to what the time machine did. If you played with the time machine you will need to adjust this up or down as the case may be for the effect you would like.
Now to add some color.
I picked a few of my elements and decided to color them to make them pop. To do this, I selected the element I wanted (Blue flower in the center for example) EFFECTS>PHOTO EFFECTS>FILM & FILTERS. Blue 87%. You can adjust these up and down as you would like. PIck a few and make them all diffrent colors.
Add any text or copyrights you may need. Resize and SAVE!
I hope you had fun learning some color effects today! Have a great week!
Blessed Be
Lorilynn Ü