THOUSANDS OF FREE BLOGGER TEMPLATES

Notice

My Daughter was born on Feb 14, 2010 and she is wonderfully healthy! Thank you for all the wonderful emails about everything. I just wanted to say that for right now since life has gotten so busy I am working mainly on tags and layouts. There will be the occasional tutorial but not as many as before. I am sorry if this causes any problems, but family comes first! I hope this finds all my followers doing well! Blessed Be! ~Lori

Quick Links

These are the Quick Links to my most used supplies =]

PSP
Alien Skin
Vix
Squirlz Water Reflections
Garvey
Gorjuss
Animation Shop

Saturday, March 28, 2009

Easter Bunny


  • For this tutorial I used:
  • The wonderful scrapkit Easter Egg Hunt by Vicki and it can be found HERE
  • Eye Candy 5 Impact *Glass* which you can find for demo with install instructions HERE
  • Animation Shop
  • PSP X2
  • Lets get started...
  • OPEN your background paper of choice and resize as desired.
  • OPEN felt egg row and PASTE at the left side of your paper. DUPLICATE, MIRROR
  • On the origional egg row rotate it left or right does not matter. PASTE to the top of your paper, DUPLICATE, Mirror... this should give you a frame of the felt eggs.
  • HIDE your paper layer and MERGE VISABLE.
  • Now go to your Plugin GLASS and use these settings:
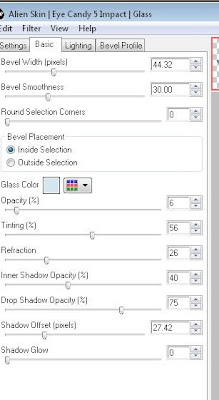
  • UNHIDE your paper layer.
  • Add your fence, bunny of choice, and other elements and names with or without drop shadows as you would wish. I also added the glass effect to my Easter banner and the name.
  • Add Copyrights and watermarks
  • RESIZE
  • STOP here if you do not want the butterfly animation and save your tag
  • If you would liek to add the butterfly (and we all know I love butterflies) resize it and paste it on one side of your tag.
  • COPY MERGED and PASTE into Animation Shop as a new animation.
  • Go back and slightly move your butterfly. repeate above but paste after current frame.
  • Continue until you have the butterfly all the way across the tag.
  • RUN
  • SAVE
  • Hope you liked this one... Thanks Vicki for adding me to your team! Blessed Be all... Lorilynn

Groovy Baby


  • For the following kit I used:
  • Animation Shop
  • Groovylicious Kit (which is a great freebie right now) By Vicki which can be found HERE
  • Tubes are by Keith Garvey and are PTU and can be bought at MyPspTubes HERE
  • Lets begin..
  • First pick your background paper of choice. I picked the polka dot one because it fit my mood at the moment.
  • Resize this to a workable size for your tag.
  • Add a new transparent raster layer... COPY the raster layer and PASTE as a new image in your work space and minimize your background paper.
  • Open the frame and PASTE into your transparent layer and RESIZE as needed.
  • PASTE embellishments however you would like.
  • Add your tubes inside the frames and crop/resize as needed.
  • ADD drop shadows as desired
  • Remember your copyrights and your watermarks.
  • Re-open your background layer that you had minimized, COPY MERGED and PASTE as a new Animation in Animation shop.
  • Right click on the blue bar around your paper, and Insert Image Effect."Rotate Colors" I used 1.5 and 14 fps.
  • Depending on your settings you will have a different amount of frames, which it will show you in the bottom right corner. Mine has 22 frames.
  • Go back to PSP and COPY MERGED your frame layer.
  • PASTE this into animation shope and press CTRL+SHFT+L 21 times, or however any frames you need minus one.
  • CTRL+A to select all frames, CTRL+C to copy
  • move to the background paper... CTRL+A and CTRL+E to PASTE
  • Run the animation and save as a .gif
  • I hope you enjoyed... Blessed Be Lorilynn

Friday, March 27, 2009

Butterfly Blues


  • For this tutorial I used the wonderful work of Rachel in a kit called Blue Denum. The kit can be found HERE
  • I also used the wonderful artwork of Keith Garvey and you can find all his tubes (all are PTU) at Mypsptubes HERE
  • I used a butterfly wing dmsk, I am unsure where I got this from, if it is yours PLEASE let me know and I will give you credit as soon as I get your mail.
  • Lets get started.....
  • First you will want to pick two papers for the kit, one for your background and one for the butterfly wings.
  • Apply the mask below to the butterfly wing paper and then paste it on to your background paper.
  • Add your tube and resize or tweek the position as you would like it.
  • Apply a drop shadow if desired.
  • At this point I merged my tube and wing layers just to make life easier as I went in case they needed resized again.
  • PIck a frame of choice, I liked the square one best but whatever you want it's your tag after all Ü
  • Apply a slight drop shadow, I used 5, 5, 100, black.
  • Add embelishments, and word art as you would like, and shadows.
  • Remember all copyrights and your mark!!
  • Resize and save.
  • Hope you enjoyed and blessed be... Lorilynn Ü

Thursday, March 19, 2009

Sorry!!!

I Am so sorry that I never posted the tut to the tag below I forgot I had not done it. I am headed to bed now so I will do it first thing in the morning I am sooooooooooo Sorry!!!! Please forgive me
Lorilynn

Friday, March 13, 2009

Summer memories


  • For this tutorial I used
  • The kit At The Beach from Bits and Bobs which can be found HERE
  • Mask #179 from VIX which can be found HERE
  • A picture that you can tube the eyes out of ** I used my cousins picture so I will not be shareing this**
  • Lets begin...
  • First I opened paper 5 and applied the mask so as to make it appear as the sky.
  • Next I took the picture of my cousin and useing the selection tool I cut out around the eyes useing a feather of 2. Just enough to make the edges rounded. I placed this under my 'sky' layer and gave it a 60% transparency.
  • Over the Sky layer I placed the bling curtain and adjusted the size to my liking.
  • Next I added the corner pieces, I started with the top left, duplicate, mirror, duplicate flip, duplicate mirror. This should make all your corners evenly spaced.
  • I added the chair to the middle... then I thought it looked a little empty so I added the sail boat UNDER the sky layer with a 70% transparency. and a 5,5,100,15 black drop shadow.
  • I added the embellishments to the corner
  • And finally I added my text of choice, and resized.
  • Don't forget your copyrights if needed.
  • Hope you enjoyed and until next time... Blessed Be
Lorilynn

Thursday, March 12, 2009

Spring Training


  • For this tutorial I used the kit Spring Spirit from Bel Vidotti Scraps which can be found HERE
  • My Tube of choice was by Keith Garvey and you can purchase her HERE
  • The mask I have used is included below I *Think* it was PSP stock, if not and you happen to know where I need to link back for it please let me know and I will get this corrected ASAP!
  • Lets Begin...
  • Pick a paper of choice from the ones provided, and apply the mask, or one of your liking. Apply drop shadow if desired. Mine was 8,8,100, 20, black.
  • Add the tag of choice, position, resize and drop shadow as desired.
  • I made my flower arangment of 3 tulips as well as the big blue daisy and greenery, all with drop shadows. You can make yours as desired. Also you can add any other embelishments you may want to use.
  • Add your tube of choice. With mine I wanted it to appear she was coming out of the tag so I added her above my bow but under my butterfly. I added my drop shadow, and then useing the circle selection I croped everything off from around the tag to get the effect I wanted.
  • Add your copyrights & signatures
  • Add and wording or names you may want
  • Resize if desired
  • Save as a ONG for transparent background or as jpg for a white background.
  • Hope you enjoyed. Blessed Be Lorilynn

Sunday, March 8, 2009

Moonlight


  • For this tutorial you will need PSP as well as Squirlz Water reflections. You can find Squirlz HERE
  • The scrap kit I used is called Moonlight from Candy's Treats and can be bought HERE
  • The tube of my choice is a WONDERFUL PTU from Suzanne Woolcott and is ONLY Avalable until 03/13/09 because it is a fundraiser tube for Comic relief... so PLEASE go HERE to purchase the tube all proceeds will go directly to Comic relief!!
  • Lets begin....
    • Open 2 scrap papers of choice from the kit. I used the moon over the water as well as the black pinstripes. I placed one over the other and brought the top layer transparancy down to a 65% which is where I liked it, if you would like more or less feel free.
    • I picked the frame I liked and applied that to my background, and moved it down slightly, placed a 10, 10, black 100% drop shadow on it.
    • Added my tube and trimed the excess for the effect I wanted useing my selection lasso.
    • Picked the Moonlight word art and put that above the frame.
    • Put the name under the frame also with a drop but this time in white.
    • If you would like other embellishments or anything else add them now.
    • DONT forget to provide your liceance and copyright info for your PTU tubes!!!
    • Resize if you would like and save the file.
    • Open SWR and open the tag you just saved.
    • Click on the Elipsis and you are going to want to outline everything you want a water reflection in. Kinda like so:
    • Hit the Ripple effect button and the settings I used were as follows but you can tweak to your liking:
    • Hit the GIF button in the toolbar to save the animation
    • Congrats you did it!
    • Blessed Be until next time... Lorilynn

Friday, March 6, 2009

Give It


  • For this tag I used the scrap work of Yvette, its called GirlzRock and you can find it HERE
  • I also used the artwork of the very talented Keith Garvey which can be found HERE
  • Lets begin
  • Open 2 papers of choice, your back and forground.
  • Apply mask of choice to the forground paper, COPY MERGED and paste over the background paper
  • Add Tube of choice with a drop shadow
  • Embelishments as you would like. I kept it simple a skull and the tag.
  • On the skull I changed the transparancy to 65% so as to make it blend into the backgound easier
  • Add text phrase of choice
  • Add name to the name tag
  • Inner Bevel
  • Drop Shadow
  • resize
  • save!

Love Eternal

  • For the following tut I used the wonderful kit SNOWBRIDE from Bits N Bobs which can be found HERE
  • Open and resize 2 papers of choice to 60% if you choose recolor the papers.
  • Load mask of choice, (I used one from Scrap Dementions) On the paper you wish to be on top.
  • Place the paper on top of your bottom layer by *COPY MERGED* and *PASTE AS NEW LAYER*
  • Apply a drop shadow if you wish, I used 10,10,100, 17 black.
  • Add Journal and position to your liking
  • Add the text you wish
  • Add embellishments and drop shadows
  • Add Bead string and your phrase
  • Add names and copyrights if required
  • Save!