- For this tutorial I used:
- The wonderful scrapkit Easter Egg Hunt by Vicki and it can be found HERE
- Eye Candy 5 Impact *Glass* which you can find for demo with install instructions HERE
- Animation Shop
- PSP X2
- Lets get started...
- OPEN your background paper of choice and resize as desired.
- OPEN felt egg row and PASTE at the left side of your paper. DUPLICATE, MIRROR
- On the origional egg row rotate it left or right does not matter. PASTE to the top of your paper, DUPLICATE, Mirror... this should give you a frame of the felt eggs.
- HIDE your paper layer and MERGE VISABLE.
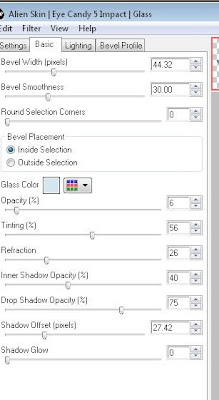
- Now go to your Plugin GLASS and use these settings:

- UNHIDE your paper layer.
- Add your fence, bunny of choice, and other elements and names with or without drop shadows as you would wish. I also added the glass effect to my Easter banner and the name.
- Add Copyrights and watermarks
- RESIZE
- STOP here if you do not want the butterfly animation and save your tag
- If you would liek to add the butterfly (and we all know I love butterflies) resize it and paste it on one side of your tag.
- COPY MERGED and PASTE into Animation Shop as a new animation.
- Go back and slightly move your butterfly. repeate above but paste after current frame.
- Continue until you have the butterfly all the way across the tag.
- RUN
- SAVE
- Hope you liked this one... Thanks Vicki for adding me to your team! Blessed Be all... Lorilynn


0 comments:
Post a Comment