


Thursday, October 29, 2009
Wednesday, October 28, 2009
Jail Bird
 For this tutorial I used a kit by Gina called 'Jail Birds' Which can be purchased HERE. The great part of this kit is 100% of the proceeds are going to help her local jail, all the inmates that have no one on the outside to help them with basic needs.
- Vix mask #250 which can be found in my quick links.
- Edge Burst mask which comes with PSP 9 and above.

To begin open a new canvas 800x800 transprent and Open paper 03
While you have the transparent layer active, go to your flood fill tool, select either your foreground or background>Patterm>Paper 03 and resize to about 40% Flood fill the transparent layer with this.
Apply the mask to this layer, and add a drop shadow of 4, 4, 100, 5.50 Black. Merge Visable.
Place the door in the middle of your mask, and downsize it to fit your needs.
Open barbed wire and place on all four sides to make a frame.
Open Fence, and place in all four corners, you may have to move this around so the peices overlap properly and look right. Merge all fence layers and then apply a drop shadow. Place this layer behind everything else. You may have to first promote the background layer to a raster before you can do this, just right click on the background layer and convert to raster.
Place your tube of choice behind the door.
Decorate the frame as you wish with the elements in the kit.
Remember all copyrights!!
Merge Visible
Apply Edge Burst mask
Resize tag
Tuesday, October 27, 2009
Baby Days

For this tutorial I used the work of Laurie at Candy Coated Scraps. The Kit name is My Angels and can be found HERE
Vix Mask #333 you can find the link to that in my quick links on the right hand side of the page.
Animations Shop you can find the link to that in my quick links on the right hand side of the page.
To begin you will ned to open elements 16 and 17, the flower frames.
Useing your freehand selection tool you are going to want to select around one of the flower bunches. and Copy
On your other flower frame you are going to paste as a new layer. Move this so it covers the same flower on the new frame.
Go back and repeate these steps with every other flower bunch, or how ever you would like until your new frame looks the way you would like it.
Layers>Merge Visable Minamize this canvas.
Open 2 papers of choice, one blue and one pink.
Apply the Vix Mask 333 to one of your papers. Copy Merged
Paste on your other Paper. I added a drop shadow of 2, 2, 100, 10 black
Copy Merged
Open Frame back up and Paste this as a new layer Under your frame.
Using your freehand selection tool, draw around the inside of the frame. Invert Selection, making sure you have the papers layer seleced hit delete on your keyboard.
You should now have the background only inside your frame.
This is where you can get creative and you can add what ever elements you would like to your frame.
Add any wording you would like.
Remember your copyrights
Merge ALL
Add your rocking horse and place where you would like it, with the nose of the horse pointed slightly downwards.
Resize, I made mine to around 400x400
Copy Merged
In Animation Shop Paste the as a new animation
Back to PSP, Rotate the rocking horse so it appears to be sitting level and copy Merged
Animations Shop> Paste after current frame.
Back to PSP
Rotate again until the tail in pointed downwards, Copy Merged
Animation Shop, Paste after current frame.
Select your 2nd frame by making sure it is the only frame with a red and blue line around it, Copy
Paste this after frame 3\
Select all by hitting Ctrl + A
Animation>Frame Properties and change this number to around 40
Run your animation and save!
Tut Share

I was grazing over at Horse Play's and I found this tutorial and I love it, so I thought I would share a link to it so you can all check out her amazingly awesome tuts too! To go to this Tut please go HERE
Wednesday, October 21, 2009
Winter Ice (and external tutorial)
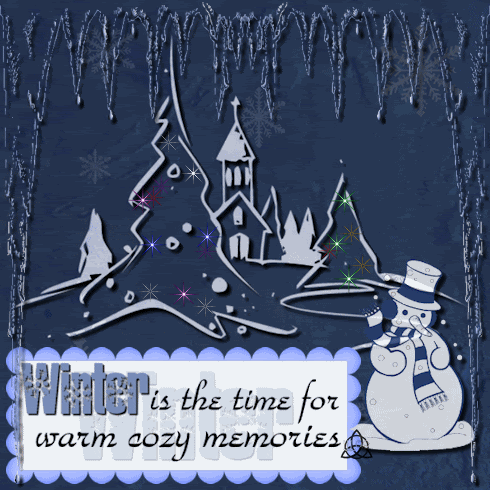
For this tutorial I have used the work of Dorthi and the kit is called Midnight Winter. You may buy it HERE
Sparkle tutorial by Patti found HERE
Animation Shop found in my quick links
Mask by Vix number 302 found in my quick links
FIRST do the sparkle tutorial if you do not already have your own sparkles. Remember to export them and have them named so you will be able to find them easy. Then you ar ready to start the rest of this tutorial.
From the kit pick your two papers and open them.
Apply your Vix mask to one of them (Layers, Load/Save Mask, Load mask from Disk)
Apply a drop shadow. I used 4,4,100, 4, black (Effects, 3D effeclts, Drop Shadow)
Open Ice Border, resize as needed and place off to one side. Duplicate, Mirror. You can play around with these until you get them where you would like them. Merge Down. Apply a Drop Shadow with the same settigs as above.
Open Tag 2 as well as Winter both from the kit.
Copy Winter and Paste as a new layer into the tag. Streach this out so it fills the middle of the tag. Add a drop shadow as above. Lower the transparancy to 40.
Copy and paste Winter tag again into the tag. Resize and move so it is in the top left corner in the inside of the tag. Apply Drop Shadow same settings as above. Add your wording
Copy tag MERGED and paste into your tag and place it where you would like it. Add a drop shadow.
Open Snowman 2 and copy and paste him into your tag and resize as needed. Give him a drop shadow as well.
Add any other wording or embelishments you would like to add to make your tag now. Do not forget your copyrigts!
MERGE ALL, RESIZE as desired and save the tag before we begin the animation just to be safe ;o)
Layers, New Raster layer.
With your picture tube tool, find your sparkles, resize them as needed. I used about a 15 for mine. Place them all over your tree(s)
Copy Merged
Open Animation Shop and Paste as a new animation.
Back in PSP. Delete the new raster Layer. Add a new raster layer, add sparkles again, trying to place in diffrent positions as before. Copy Merged
Animation Shop, Paste after current frame.
Run animation and save your tag =)
Sunday, October 18, 2009
Autumn Falls

This tag was made from the Autumn Falls Kit by Jo at Scrappin Brats and can be purchased HERE I may tut this one later this afternoon. Thank you Jo for use of the Kit =)
Saturday, October 17, 2009
Blue Christmas
OK ya'll are going to have to click the picture to see it fully, I still have not fighured out how to fix that when I insert animated tags I am very sorry!!!!
I found this tutorial while I was looking for Christmas scraps so I went ahead and tried it and I thought I would share my results with you all. I really liked this one. I found it on PSPPals HERE Go ahead and give it a try. I really enjoyed learning how to make the spinning stars look right =) Thanks PSP Pals!
Friday, October 16, 2009
Another tag from Cute Christmas

Used Cute Christmas by Tisha for this tag as well. I may tut it later tonight.
Happy Holidays

For this tutorial I used the Kit Cute Christmas by Tisha which can be purchased HERE
Animation Shop *** If desired *** which can be found in my Quick Links
Open a transparent 800 x 800 canvas
Open both christmas lights and resize to what ever you would like I believed I used about 8%. You are going to rotate these across the bottom of the empty canvas. When you reach the end of the row, Layers>Merge>Merge Visable. Drop Shadow 8,8, 100, 5, black.
Right click on your light strand, Duplicate, Flip
******************
For animated tag:
Copy Merged, Paste as a new layer.
Minamize one of your canvases. You will keep one as your original and the other as your work canvas.
On the open one paste each of your bulbs again.
You are going to cover the green bulbs with the red and the red with the green so you can create the blinking effect.
Once again when you get to the end of the strand row, hide the base rows so all that is showing is the new lights, Copy Merged and flip to cover the top row. (to hide just go to your layers pallet and click on the eye ball next to each layer.)
*********************
Open frame of your choice and resize to fit into your canvas. Add a drop shadow if you would like. I used 4, 4, 100, 7, black.(this is the setting I will use throughout this tutorial)
Open paper of choice and paste under the frame.
Useing free hand selection tool, point to point with a zero feather go around the inside of your frame.
Switch layers so you are on the background layer and invert your selection and hit delete on your keyboard. This should give you just the inside of the frame for your new background layer.
Switch back to your frame and add a drop shadow.
Add your elements of choice inside of your frame as well as outside.
Add all copyrights needed.
If you would like a total background add it now I used the green paper which I had to resize a touch.
For a NON ANIMATED TAG, add your wording and resize. Save and you are all done.
for an ANIMATED TAG:
Resize your work layer and your other light layer to the same sizes
On your work Layer COPY MERGED and PASTE as a new animation into Animation Shop Ctrl + Shft + L so you have 2 animation frames.
Light layer Copy Merged and paste on top of ONE of your Animation frames.
(To test that you have done this properly just run the animation and make sure you have everything properly lined up)
Back in PSP add your wording for your tag. Hide every other layer but your wording and copy merged
Paste as a new animation in AS, CTRL + SHFT + L to make 2 frames, Ctrl+ A and then Ctrl + C to Copy
On your base layer Ctrl + A and Ctrl + E to paste. This will be floating after you hit Ctrl+ E so make sure when you click again it is where you would like it.
Under Animation>Animation Properties you can increase the frame rate to slow down your flashing lights. Just make sure you have hi Ctrl+A so both frames are selected before youd o this.
Save your tag!
Wednesday, October 14, 2009
Lullaby of Love
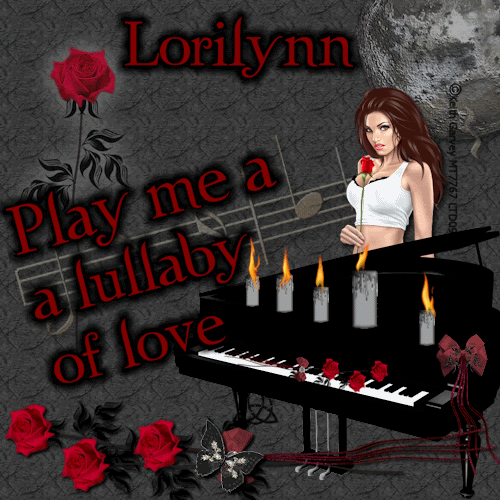
For this tutorial I used the Eternal Love kit from Tootypup which can be purchased HERE
The wonderful art of Keith Garvy called 'Rosebud' which can be purchased HERE
Alien Skin G radiant Glow which can be purchased HERE
Animation Shop
Open paper 6e
Place moon 1 in the top corner with a transparency of 70% and a drop shadow of 4, 4, 100. 10 black
Place Music notes 1 in the middle of your paper, cross wise, also with the same drop shadow
Place tube of choice on the right hand side around the middle with a drop shadow
Open Piano and place it over the tube to simulate her behind it.
Add ribon 1b to the side of the piano
Place candle 3 in different resizes across the piano
Place Ribbon 2 across the floor with butterfly 3 over the ribbon (drop shadow to both)
Add all copyright information
Add the text and names you have chosen and convert text layer to a raster layer
Alien Skin> G radiant Glow> Green Glow and change the settings to black with a radius of 14
Resize to 50% and Save tag here so as not to lose any of your work.
Open Animation Shop
Back on your tag go to picture tubes and you should have the flame tube that is included with most all versions of PSP, you are going to want to resize this to about 20. Play around till you have it how you want it.
Place a nice flame atop each candle, if you don't like the one you are given you can undo and replace it to get another one.
Copy Merged and Paste into Animation Shop as a new animation
Back in PSP Undo each of your flames, and this time resize to either 25 or 15 and repeate the flames. Copy merged and paste in Animation shop AFTER current frame
Back to PSP and repete above step. I did this for a total of 3 frames, you can do more or less as you would like.
Run your animation and save
Home

For this kit I used the work of Gina from KiKeKa Kits, Falling for you which can be purchashed HERE
Vix Mask 260 which can be downloaded HERE
Alien Skin Impact Gradiant Glow for download HERE
Open Paper 9 from the kit and apply the mask to it. Merge Visable, Drop Shadow 5,5,100,8, black.
Open Paper 10 and using the crop tool you need a 400x400 section. Copy.
Paste the Paper 10 layer under the frame.
Open Branch 5 from the elements and place at the bottom left, duplicate, mirror, Merge Down, Drop Shadow 5, 5, 14, 100, Black.
Open pine cone and place slightly off center,( you may wish to resize slightly) duplicate, mirror.
Open flower 5 and place between the pine cones, you may have to resize it for it to look right.Drop shadow with the same settings as the last time.
Inside the frame pick a few elements that you like and place them accordingly. I used the cattail, Mr. Turkey & pumpkin. All with the same drop shadow as before.
Add your needed copyrights.
Add all wording
Convert Wording layer to Raster by right clicking on the layer and convert to raster.
Effects>PlugIns> AS Impact>Gradiant Glow> Dark Aura... In the settigns for this you want to change the colors (Black and purple just do not look right here lol) For the first color I used the med nrown from Mr Turkeys feathers, Middle color is the next feather down, and the last is the next feather down. I used a glow radius of 8 and left everything else alone.
SAVE tag as either a .jpg (white background) or a .gif (for a transparent background).
Sunday, October 11, 2009
October is Breast Cancer Awarness Month!

I made this tag with the Think Pink Kit from Gina at KiKeKa Kits available HERE
Thanks Gina XOXOXO


Subscribe to:
Posts (Atom)


