THOUSANDS OF FREE BLOGGER TEMPLATES �

Notice

My Daughter was born on Feb 14, 2010 and she is wonderfully healthy! Thank you for all the wonderful emails about everything. I just wanted to say that for right now since life has gotten so busy I am working mainly on tags and layouts. There will be the occasional tutorial but not as many as before. I am sorry if this causes any problems, but family comes first! I hope this finds all my followers doing well! Blessed Be! ~Lori

Quick Links

These are the Quick Links to my most used supplies =]

PSP
Alien Skin
Vix
Squirlz Water Reflections
Garvey
Gorjuss
Animation Shop
Showing posts with label Yvette. Show all posts

Friday, March 6, 2009

Give It


  • For this tag I used the scrap work of Yvette, its called GirlzRock and you can find it HERE
  • I also used the artwork of the very talented Keith Garvey which can be found HERE
  • Lets begin
  • Open 2 papers of choice, your back and forground.
  • Apply mask of choice to the forground paper, COPY MERGED and paste over the background paper
  • Add Tube of choice with a drop shadow
  • Embelishments as you would like. I kept it simple a skull and the tag.
  • On the skull I changed the transparancy to 65% so as to make it blend into the backgound easier
  • Add text phrase of choice
  • Add name to the name tag
  • Inner Bevel
  • Drop Shadow
  • resize
  • save!

Thursday, January 29, 2009

Date Night (Animated)


Tutorials are written for someone with a working knowledge of PSP. All Tutorials are made by me any resemblance to any other tut is purely coincidental and unintended. Remember to save often as you go!
Supplies used in this Tut are
  1. Paint Shop Pro (I have 2x but any will do)
  2. Alien Skin Xenofex
  3. Animation Shop
  4. Scrap kit Hearts Desire by Yvette found here
  5. I used the artwork of Keith Garvey which you must have a licence for and can be purchased here
  • Open a transparent canvas 700x700.
  • If you would like a background picture on this please feel free to add it now.
  • Open and paste one of the envelops on the canvas and position it to your liking. Add drop shadow 8, 8, black, 100, 27.
  • Arrange roses and branches how you would like. Add drop shadow.
  • Add Ticket Stubs and other embellishments as you wish.
  • Add Tube and place Under the envelope as desired.
  • Make sure you add all copyrights to your work.
  • Copy merged and paste as three (3) new images.
  • Using Alien Skin Xenofex 2 Constellation apply the follorwing settings (you can tweak them for the effect you would like)
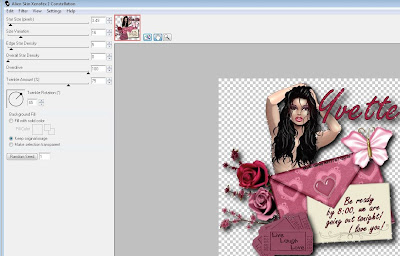
  • Do this with a random seed on all three layers
  • Copy the first layer and paste as a new animation in Animation Shop, then copy and paste each additional layer after it.
  • Run the file and save!
I hope that you enjoyed this Tutorial. Blessed Be ~Lorilynn